As an Amazon Associate, we earn from qualifying purchases. Some links on this site are affiliate links at no extra cost to you. Our recommendations are based on thorough research and editorial judgment.

Using Layered Lighting: Path, Wall, and Flood Motion Lights Together
1) Purpose: Layered outdoor lighting combines path, wall, and flood motion fixtures to provide navigation, task illumination, and security, with target ambient levels of 10–30 lux. 2) Path: Use 300–500 lm fixtures spaced 2–3 m, beam spreads 10–40°, mounted 0.3–0.9 m high for 5–15 lux on treads. 3) Wall: Install 400–800 lm sconces at 1.5–1.8 m, warm 2700–3000K. 4) Floods: Fit 1200–2400 lm PIR units, beams 60–120°, sensors 2–3 m high. Follow IP65 rating and wiring; more guidance follows.
Key Takeaways
- Layered lighting combines ambient, task, and accent layers to balance safety, function, and ambiance across outdoor spaces.
- Use path lights at 300–500 lumens, 2–3 m spacing, 10–40° beam spreads, and warm 2700–3000K color temperature.
- Mount wall sconces 1.5–1.8 m high at 400–800 lumens, shield uplight or provide controlled downlight for glare reduction.
- Deploy flood motion lights at 1200–4000 lumens with 60–120° beams and PIR sensors for active security and energy savings.
- Protect wiring with outdoor-rated cable, IP65 fixtures near ground level, and integrate timers, motion sensors, and smart controllers for efficiency.
What Is Layered Lighting and Why It Matters
You may be interested
1. Layered Lighting is a deliberate design methodology that combines ambient lighting, task lighting, and accent lighting to produce multi-dimensional outdoor environments, enhancing safety and aesthetic coherence. 2. Definition and purpose: Layered Lighting organizes luminous layers by intensity, color temperature, and beam spread, typically specifying ambient levels of 10–30 lux for general circulation, task zones at 100–300 lux for functional activities, and accent spots at 300–800 lux for focal features. 3. Implementation guidelines: space fixtures to achieve 3–6 meter spacing for even ambient coverage, select 2700–3000K for warm tone consistency, and use narrow 10–20 degree beams for accent to create visual interest. 4. Benefits: increased versatility, usability, and depth. Designers should document zone drawings, control strategies, and dimming schedules to guarantee predictable performance reliability. 5. Solar motion security lights with IP65 weatherproofing ensure durability and performance in outdoor environments, making them an ideal component for layered lighting designs.
Core Components: Path Lights, Wall Fixtures, and Flood Motion Lights

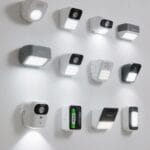
Installers should integrate path lights, wall fixtures, and flood motion lights into a coordinated system, specifying spacing, mounting heights, lumen targets, beam angles, and control logic to achieve predictable layered illumination. 1. Path lights: Use 300–500 lm fixtures spaced 2–3 m apart for low-level ambient guidance, set beam spreads of 10–40°, and mount finishes at 300–450 mm above grade, using 2700–3000 K LEDs to reduce glare, enhancing outdoor spaces. 2. Wall fixtures: Select 400–800 lm sconces, mount at 1.5–1.8 m above finished floor, aim down or shielded uplight, choose beam angles to highlight architecture, integrate dimming and occupancy controls for energy efficiency. 3. Flood motion lights: Specify 1200–4000 lm units, wide beams 60–120°, PIR sensors with 5–15 m range, and timers for security. Many modern solar path lights, like the KOOPER Taller Solar Pathway Lights, offer improved solar conversion efficiency and long-lasting illumination, making them ideal for sustainable layered lighting systems.
Recommended Products

【400 Lumens Motion-Activated Security Pathway lights】ELECLINK solar pathway lights outdoor feature a sleek snake-like design with 3000K warm light and 26 bright LEDs. Motion sensing pathway light delivering up to 400 lumens of motion-activated brightness, these solar lights outdoor provide brighter illumination than ordinary solar pathway lights. The wide light coverage improves visibility for walkways, driveways, gardens, lawns, patios, and yards, creating a safer and more inviting outdoor environment

Solar Powered & Energy Saving: Solar spot lights use solar energy to charge, which can automatically sense light, automatically turn on at night, and automatically charge during the day, saving electricity and reducing energy consumption. No wires are required, which not only saves energy, but also saves you a lot of money on your electricity bill

3 LIGHTING MODES FOR ALL-NIGHT ILLUMINATION: Solar motion lights outdoor have 3 lighting modes to choose from, constant light mode (40 Lumens); Motion sensing mode (30 to 300 Lumens/25 to 200 Lumens), when someone passes by, intelligent infrared detection can sense wide-angle distances of 26ft and 160°.
Designing for Safety: Illuminating Walkways and Steps

Pathway lighting strategy should specify placement, lumen targets, mounting heights, beam spreads, and control logic to ascertain safe walkway and step navigation. 1. Layout and mounting: Place pathway lights at 6-8 foot intervals, set Bollard Lights or post heights to 18-36 inches, position wall sconces at 5-7 feet to create vertical illumination. 2. Photometrics and color: Aim for 5-15 lux on tread surfaces, select warm 3000K or lower to illuminate pathways without glare, use narrow beams for step edges and wider spreads for corridors. 3. Controls and security: Integrate dimming, timers, and motion-activated floodlights for immediate visibility and deterrence, ascertain circuits isolate zones for maintenance and redundancy. 4. Implementation: Document plans with measured lux values, verify night, and adjust aiming to eliminate hot spots. When selecting solar lights for pathway illumination, consider options like GIGALUMI Solar Lights which offer a unique water-ripple pattern for enhancing garden aesthetics while providing weather-resistant functionality.
Creating Ambiance With Wall-Mounted Lighting

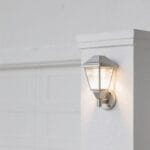
- The wall-mounted lighting strategy defines fixture selection, mounting heights, lumen outputs, color temperature, and aiming requirements to create controlled ambiance while maintaining functional illumination and security. It specifies sconce placement at 1.5–1.8 m above finish grade for entries, recommends 300–800 lumens per fixture depending on scale, and prefers 2700–3000 K for warm tones, balancing decorative appeal and practical visibility. Use adjustable brightness controls and IP65-rated housings in exposed locations.
- Select classic lantern sconces for durability and aesthetic benefits, match beam angles to reveal masonry, and use specialty accent modules to highlight plants or trim.
- Proper spacing and shielding enhance safety while preserving atmosphere. Proper installation and targeted illumination patterns enhance safety, deterring intruders and reducing glare for occupants. Maintain routine lamp maintenance.
- Motion-activated path lights with features like adjustable sensitivity settings and wide detection angles can complement wall-mounted lighting by enhancing security.
Using Flood Motion Lights for Security and Convenience

- Flood motion lights serve as primary active deterrents, activating instant illumination when movement is detected, improving security by startling intruders and providing clear visibility for cameras and residents.
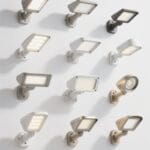
- Technical specifications and placement: mount sensors 6–10 feet high, angle beams to cover 120–180 degrees, select 800–2400 lumen LEDs for driveways or yards up to 30 feet, and choose IP65 or higher weather ratings for durability.
- Controls and customization: use adjustable sensitivity and timers, integrate with dusk-to-dawn sensors or smart systems, and zone lights to avoid nuisances.
- Layered lighting integration: combine with path and wall fixtures to create layered lighting that guides circulation, protects entry points, expands usable outdoor space, and delivers up to 80% energy savings. Installation should follow local codes.
- Adjustable lighting features such as customizable sensor sensitivity and multiple runtime settings help in meeting specific needs, enhancing security by reducing false triggers and providing tailored coverage.
Balancing Brightness: Lumens, Beam Angles, and Color Temperature
1) Lumens, beam angles, and color temperature determine effective outdoor illumination, with specific lumen targets, angular spreads, and Kelvin ranges guiding fixture selection. 1) Set lumen targets: path lights should deliver about 200–400 lumens each, wall lights 300–800 lumens, and flood fixtures adjustable from 800–3000 lumens depending on coverage, ensuring visibility without glare. 2) Choose beam angles: wide beams (60–120°) cover driveways and broad surfaces, narrow beams (10–30°) accentuate features, and medium beams (30–60°) bridge zones. 3) Select color temperature: specify 2700K–3000K for warm ambiance, 4000K–5000K for energetic modern scenes, and match temperatures across layered lighting to avoid discordant tones. Balance flood output and beam shaping carefully, so brighter fixtures enhance safety without overpowering path and wall lights, maintaining cohesive outdoor lights and comfort. When choosing outdoor lighting, consider options with an IP65 weatherproof rating to ensure durability and performance in varying weather conditions.
Strategic Placement: Where to Install Each Layer
Effective placement builds on the prior specifications for lumens, beam angles, and color temperature by assigning each fixture type to roles and coordinates that optimize coverage, minimize glare, and preserve consistent color rendering across adjoining zones, ensuring engineered illumination, not brightness, strategic placement. 1. Path layout: Install Path Lighting along walkways and driveways at 6 to 8 foot intervals to provide ambient illumination and navigation, use low-lumen fixtures to reduce spill and maintain contrast. 2. Wall placement: Mount wall sconces near entrances and along building sides at 5 to 6 feet to accent architecture while providing security, space them to prevent gaps. 3. Security coverage: Position flood motion lights near garages and dark corners to deliver broad, motion-activated coverage layered lighting strategic placement effectively. Most sensors are designed to perform reliably in adverse conditions, which is crucial for maintaining security and reliability during harsh weather events.
Wiring, Power Options, and Control Systems
Reliability in outdoor lighting depends on proper wiring methods, durable weatherproof connectors, and correctly chosen power and control systems to guarantee consistent operation and long service life. 1. Wiring: Use outdoor-rated 12/2 or 14/2 UF cable for 120V runs, and 16–12 AWG landscape wire for 12V systems, protect splices with gel-filled, IP68-rated connectors, and bury cables 6–12 inches where required by code. 2. Power options: Select 12V transformers sized at 20–30% above total LED load for pathways, or 120V circuits for flood motion lights on dedicated 15A breakers, balance voltage drop with shorter runs or heavier gauge. Consider materials like ABS and PC for rust resistance when selecting solar path lights to enhance durability in all-weather conditions. 3. Control systems: Integrate motion sensors, timers, and smart controllers for scheduling, dimming, remote operation, and periodic testing. Regular inspections increase reliability and reduce unexpected outages rapidly.
Weatherproofing and Choosing Durable Fixtures
- Weatherproofing standards: Select fixtures with a minimum IP rating of IP44, which provides protection against solid objects over 1 mm and splashing water, suitable for exposed eaves and pathway posts, specify IP65 for floodlights near ground-level spray. Many models feature dusk-to-dawn functionality, enhancing convenience and energy efficiency.
- Material selection and durability: Choose durable fixtures in brass or aluminum alloys, with corrosion-resistant finishes and a thickness of 1.5–3.0 mm for housings, verify stainless steel fasteners and silicone gaskets rated to -40°C to 85°C.
- Outdoor lighting choices and LED options: Use outdoor lighting products designed for temperature cycles and UV exposure, prefer LED modules with ≥70 CRI and 30,000+ hour life, employ sealed driver compartments to prevent moisture ingress. Install fixtures with integrated drainage channels and 20–50 mm mounting standoffs. This increases longevity.
Recommended Products

⭐ PAR38 LED Bulbs, Spotlights, LED Floodlights Outdoor, Led Flood Light Bulbs Outdoor

[Smooth Dimmable] Our PAR38 outdoor LED flood lights provide a seamless dimming from 10% to 100%, you can adjust the brightness according to your preferences, creating different atmospheres as desired; compatible with various dimmers, flicker free and eye-protective

Bright Daylight Illumination: Producing crisp 5000K daylight white light, these outdoor LED flood light bulbs provide high visibility and enhanced security for your garage, yard, driveway, or porch
Maintenance Tips to Keep Outdoor Lighting Performing
The maintenance program begins with routine cleaning and inspection, including lens cleaning every six months using a non‑abrasive microfiber cloth and 70% isopropyl wipe, verification of silicone gaskets and drainage channels, and operational checks of motion sensors, solar chargers, and wiring continuity. 1. Cleaning and optical care: clean lenses biannually to maintain lumen output, remove debris with microfiber, inspect lenses for scratches exceeding 0.5 mm and replace damaged lenses to preserve beam pattern. 2. Electrical checks: check wiring connections annually, tighten terminals to 0.5 N·m where specified, test circuit continuity and GFCI operation to prevent outages. 3. Component replacement and maintenance tips: replace burnt-out bulbs promptly, inspect motion sensors for proper detection angles, and swap solar batteries every two to three years. Ensure ingress protection (IP65 or greater) is maintained to protect against weather damage. Follow manufacturer specifications.
Budgeting and ROI: Cost-Effective Lighting Choices
- Budgeting: A practical estimate for a typical installation ranges from $1,500 to $3,500, depending on area, trenching depth of 6–12 inches, conduit runs, and fixture density per 100 ft. Homeowners should allocate line-item costs, for example $50–$100 per solar path fixture, $150–$400 per LED wall sconce, and $200–$600 per motion flood including wiring.
- ROI analysis: LED fixtures reduce energy use by up to 80%, decreasing annual operating costs, and motion sensor floods can cut roughly $200 per year in electricity. Over a decade, expected ROI includes lower maintenance and perceived property-value increases up to 20%.
- Cost-effective implementation: Prioritize LED and sensor-controlled zones, balance solar path lights with wired fixtures, phase installation to match budgeting, and plan outdoor lighting solutions for homeowners.
Recommended Products

ENERGY SAVING: LED units output 72W, 7500 Lumens, 5000K brightness(daylight white), equivalent to 720W incandescent bulb. Also save your electricity bill by up to 88%.

Hardwire connection, NO battery powered, NO solar powered, NO plug in, NO camera

38 W Brightness and Energy Saving: Powered by LED lamp bead as the security light source, enabling it to produce up to 4200 lumens at low power of 38 W; With optical design filter lens, it provides better illumination; Save more than 80% electricity bill compared with equivalent traditional lights 175 W
Styling Ideas: Matching Fixtures to Landscape and Architecture
Matching fixtures to a property’s architectural language enhances long-term value and aligns with prior budgeting choices, by selecting form, finish, and mounting heights that reinforce the building’s lines while optimizing illumination levels and maintenance costs. 1. Site analysis: Evaluate architectural features, rooflines, and plant masses, then choose fixtures that mirror proportions and materials, for example slim 8–12 cm profile path lights for modern beds, and 30–45 cm lanterns for traditional porches. 2. Color and finish: Select bronze, wrought iron, or polished aluminum finishes to integrate with landscape lighting palettes, maintain uniform light temperature at 2700K–3000K, and reduce color mismatch. 3. Layering and heights: Use 0.2–0.6 m path lights, 1.5–2.0 m wall sconces, and 3–4 m flood mounting for balanced coverage, and simplify long-term upkeep.
Frequently Asked Questions
Should You Stagger Pathway Lights?
Yes. Designers recommend staggered placement of pathway lights within a lighting design to add visual interest, address safety concerns, guide movement, and maintain a gentle ambient glow that complements surrounding landscape features while adding depth.
How to Daisy Chain Outdoor Lights?
Daisy chain outdoor lights by wiring fixtures in series from one power source; a neighbor likened them to beads. Monitor ≤80%, use outdoor light connections, wiring techniques, motion sensor placement, light positioning, energy efficiency tips.
What Is the Rule of Thumb for Outdoor Lighting?
One rule of thumb for outdoor lighting is to layer lighting by lighting zones, balance brightness levels for safety and ambiance, prioritize energy efficiency with motion sensors, highlight pathways and decorative accents without causing glare.
What Are the Three Layers of Lighting for Every Space Include?
The three layers are ambient, task, and accent. Ambient lighting options provide glow; task lighting types focus functional illumination; accent lighting techniques highlight features. Lighting layer importance underscores outdoor lighting benefits: safety, aesthetics, and usability.


