As an Amazon Associate, we earn from qualifying purchases. Some links on this site are affiliate links at no extra cost to you. Our recommendations are based on thorough research and editorial judgment.

Motion‑Activated Lighting for RV Pads and Campsites at Home
1. Overview: Motion‑activated lighting increases RV pad safety by using IP65 enclosures, 6–8ft mounting heights, 90–120° sensor cones, and 12‑second auto‑off timers, ensuring detection and energy efficiency; 2. Power: select solar panels sized to the light array, or use 18650/AA NiMH rechargeables with 3.7–4.2V per cell and replace every three months; 3. Placement: mount fixtures 7–10ft high for ideal coverage, avoid food areas, and adjust sensitivity during commissioning. Continue for installation and maintenance guidance next.
Key Takeaways
- Motion-activated LED lights improve safety and perimeter security around RV pads by automatically illuminating entries and pathways.
- Choose sensors with 90–120° coverage, dusk-to-dawn capability, and 12-second auto-off for efficient detection and battery savings.
- Mount lights 6–8 feet high for entries or 7–10 feet along pathways to maximize coverage and reduce glare.
- Prefer solar, IP65-rated fixtures with magnetic or adhesive mounts for tool-free installation and outdoor durability.
- Minimize wildlife disturbance with warm ≤3000K LEDs, shielded fixtures, sealed food storage, and 10–30s trigger delays.
Benefits of Motion‑Activated Lighting for RV Life
1. Benefits of motion‑activated lighting for RV life are practical and measurable, improving safety, convenience, and perimeter security for small mobile living spaces. 1) Enhanced visibility: six ultra‑bright LEDs provide focused illumination for closets, under‑sink compartments, and step areas, lighting spans of 30–60 cm and facilitating item retrieval. 2) Energy efficiency: integrated motion detector triggers, with automatic shutoff after 12 seconds of no motion, conserve battery power and extend service intervals. 3) Installation and placement: adhesive pads and magnetic mounts enable quick attachment to metal or smooth surfaces without wiring, permitting repositioning within minutes. 4) Deterrence and secure perimeters: lights activate on movement to discourage wildlife and alert occupants. These measures increase functionality and convenience. Battery life ranges from 10 hours to 3 months, depending on mode, with various models available for different installation needs. Reliable design supports routine RV living and reassuring reliability.
Recommended Products

The Seatcraft experience is where craftsmanship meets functionality. Engineered for unparalleled quality and ergonomic comfort. Sit with us and experience the decades of mastery and passion we’ve put into our seats. Don’t settle for less.

DISTINCTIVE GEOMETRIC DESIGN: ensures a sophisticated appearance from every perspective. Ergonomic shape and tilted control panel facilitates natural movements for comfortable user interaction

12V POWER EXTEND AND RETRACT OPERATION — Use either the nested arm controller or traditional switches to extend and retract your 5th wheel RV or travel trailer’s awning
Choosing the Right Motion Sensor Lights for Your Campsite
When evaluating motion sensor lights for a campsite, the decision should prioritize coverage geometry, energy management, and mounting compatibility, because these parameters directly affect nocturnal visibility and device longevity. 1. Coverage and placement: Specify sensor cone angles of 90–120 degrees, mounting heights of 6–8 feet to extend reach, and use three-light clusters per 20-foot perimeter to minimize shadows. 2. Power and runtime: Select units with automatic dusk-to-dawn sensing and 12-second shutoff, note rechargeable 2 AAA cells typically yield about three months between charges. 3. Mounting and installation: Favor tool-free adhesive pads and magnets for rapid deployment, verify adhesion surfaces, and plan locations near entrances and seating. The OXYLed set exemplifies an affordable option trusted by RV travelers. Placement height reduces direct glare. Consider choosing solar motion sensor lights with IP65 weatherproofing for enhanced outdoor durability and reliability in a variety of weather conditions.
Recommended Products

🔥 Light Up 3000 Sq.Ft – No Dark Corners, No Gimmicks:We don't play the “equivalent wattage” game. What matters is real coverage. Our 84 advanced LEDs deliver even, shadow-free brightness across 3,000 square feet – that's a full basketball court. Whether you're securing a parking lot, monitoring your barn, or lighting a backyard, you'll see every corner clearly. Adjustable beam angle puts light exactly where you need it.

🔒 [Strong Clip Design for Fence & More]Equipped with a "heavy-duty clamp", these solar lights securely attach to "fences, railings, decks, gutters, and outdoor structures"—no drilling required. The anti-slip grip ensures a firm hold even in wind or rain, making it perfect for **temporary or permanent outdoor lighting".

Super Brightness: Featuring 92 high efficiency LEDs (6000K), this magnetic motion sensor lights can illuminate a wide area of up to 800 square feet while providing 600 lumens of bright light. Built in photoelectric sensing system, automatically charging during the day and automatically turning on at night.The lamp head supports 360° free rotation and 45° up and down adjustment, providing illumination without blind spots, making nights safer and more secure
Power Options: Batteries, Rechargeables, and Solar Choices
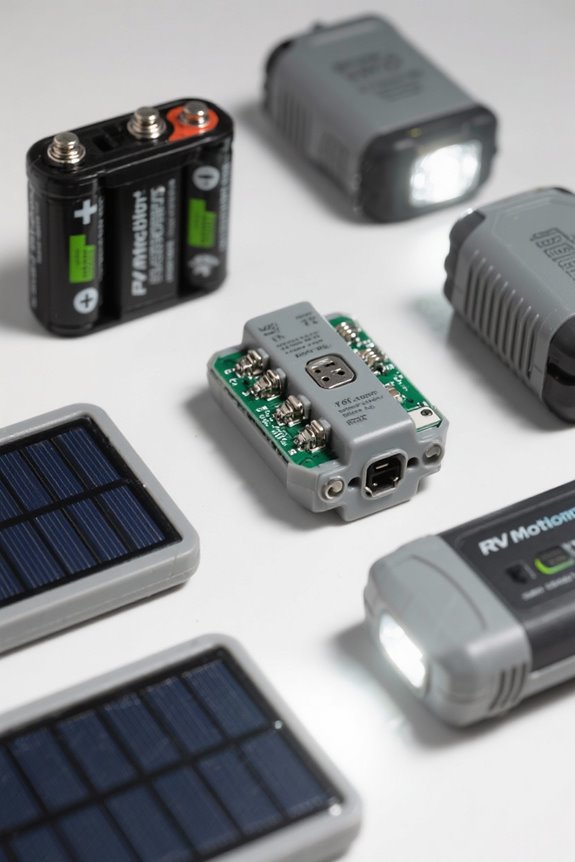
A motion-light power strategy should prioritize source reliability, recharge logistics, and mounting constraints, because these factors directly determine nightly uptime, maintenance frequency, and user safety. 1) Battery systems: standard batteries typically use 2 AAA cells per fixture, providing 200–400 lumen output for 2–6 weeks depending on duty cycle, install accessible compartments for safe replacement. 2) Rechargeable options: integrated lithium-ion packs commonly sustain about three months per charge under average activation patterns, specify 3–6 hour recharge times with USB-C or micro‑USB, maintain spare charging schedule. 3) Solar-powered solutions: photovoltaic panels charge during daylight to power LEDs at night, assess panel wattage, battery capacity, and tilt angle for reliable off-grid operation, guarantee weatherproof mounts and cleaning. IP65 waterproof rating ensures durability against various weather conditions, enhancing the lifespan of solar-powered motion sensor lights. Schedule maintenance based on measured runtime, and monitor motion lights.
Recommended Products

🚛 Large Vertical LCD display,All tires display simultaneously, Supports Type-C cable and solar charging, It can be fast-charged without occupying the car cigarette lighter socket,The monitor automatically sleeps/wakes up by movement detection or you may wake it up by press the buttons.solar system model.

EVERYTHING YOU NEED. DAY ONE. — Over $240 in essentials included so your Defend works right out of the box. You get the camera, the Defend solar panel, the rechargeable battery, a Lexar 32GB SD card, and a Field Boys cleaning cloth. No second Amazon order. No missing parts. Mount it and you're running.

DUAL-LENS 180° VIEW: Enjoy a 180° blindspot-free view with dual lenses stitching into a seamless, ultra-wide 4K perspective for complete coverage and clearer security.
Best Placement Strategies for Entryways and Pathways
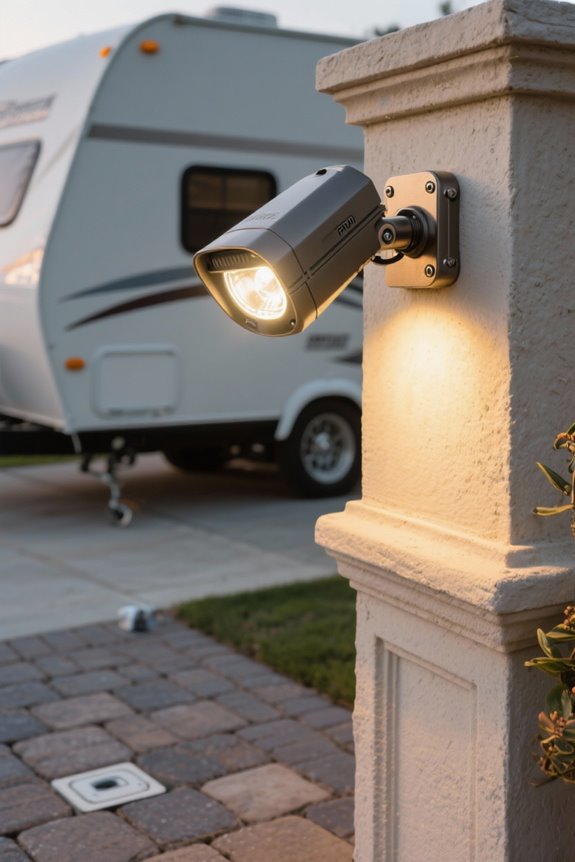
1. Placement guidelines: Install motion sensors and fixtures at 7 to 10 feet high near primary entryways to avoid face‑level glare while maximizing detection coverage, this height produces broad PIR sensor arcs and reduces false triggers. 2. Pathway illumination: Position lights to cast continuous light along routes to the RV door and high‑traffic zones, spacing fixtures to provide even lux levels and eliminate dark patches. 3. Redundancy and angles: Use multiple adjustable units aimed to overlap beams by 20–30 percent, allowing directional tuning for steps, ramps, and landings. 4. Wildlife considerations: Mount fixtures away from trash or food, minimizing animal activations and preserving functional responsiveness. These strategies enhance nighttime safety and operational reliability. Adjust sensor sensitivity during commissioning to balance detection range, reduce triggers. Additionally, consider using IP65 weatherproof models to ensure durability against rain and dust, enhancing the longevity and reliability of the lighting systems.
Recommended Products

⭐ 1. SUPER BRIGHT ILLUMINATION FOR YOUR LIFE Transform your night-time environment with this super bright solar street light outdoor. Whether it's for your backyard, garden path, or patio, the intense brightness ensures clear visibility. A must-have outdoor led solar light for family activities and safe walking at night.

💡High Output and Energy Efficient - Konlite low profile canopy lights 40W Replaces Up to 175 watts PSMH lighting fixture. Provide super bright daylight at output of 5450 Lumens for exterior or interior light fixtures, use up to 70% less energy than metal halide or high-pressure sodium lights. This is a Non-Dimmable fixture.

1200W Solar Street Lights; High Conversion 35W Mono Solar Panel – This 1200W solar street lights use a 35W mono-crystalline solar panel that captures sunlight efficiently and delivers sustainable lighting throughout the night. This high-efficiency panel is ideal for areas with the worst weather conditions as it provides photovoltaic technology thus also lowering energy costs and reducing environmental impact.
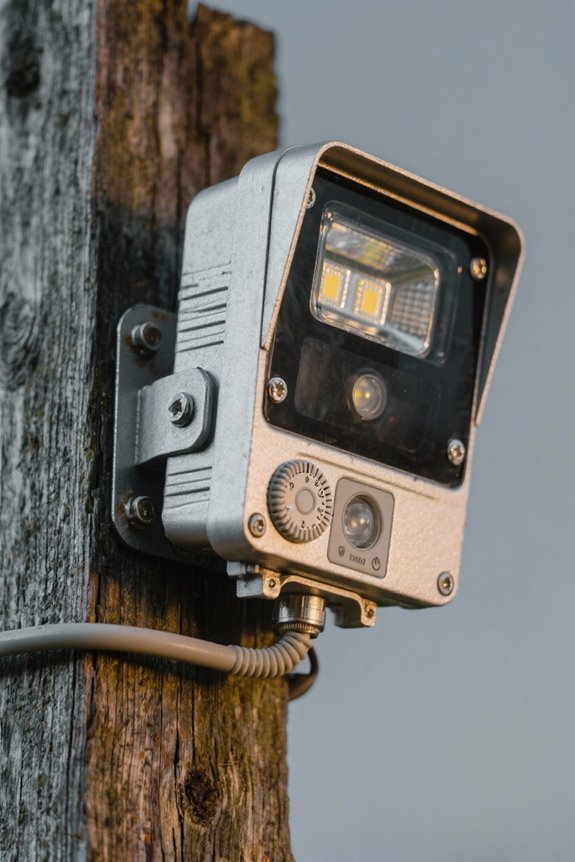
Mounting Methods: Magnets, Adhesives, and Brackets
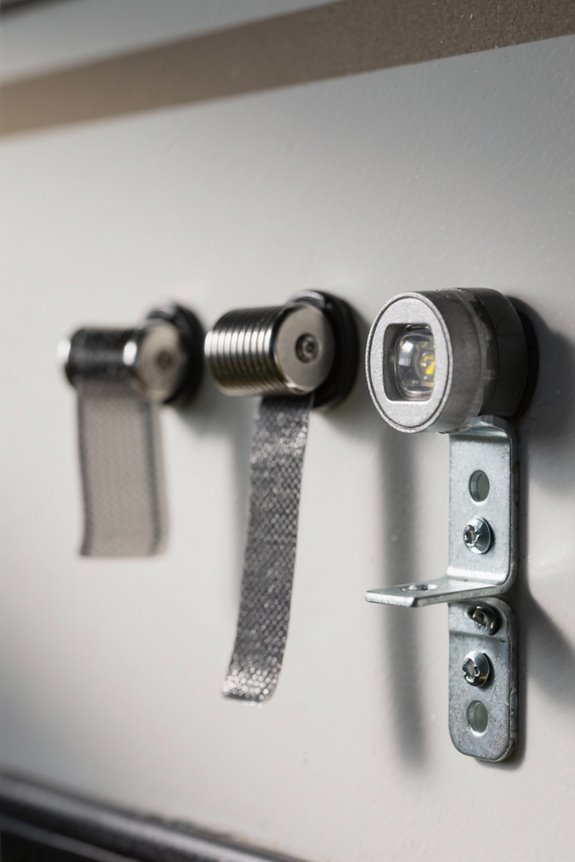
The installer must evaluate mounting method selection based on substrate, adjustability requirements, and environmental exposure, targeting 7 to 10 feet mounting heights for ideal PIR coverage while maintaining reachability for service. 1. Adhesive installations: The installer should use manufacturer-rated adhesives on smooth, clean surfaces, apply pressure for full bond, and allow 24 hours cure, suitable for indoor RV walls and sheltered campsite fixtures. 2. Magnetic mounts: Magnetic mounts provide rapid repositioning, strong hold on metal RV skins, and simplified battery access, but require ferrous substrate and corrosion-resistant magnets. 3. Brackets and hardware: Brackets, such as adjustable L-brackets, permit precise aiming, secure mechanical attachment to wood or masonry, and accommodate cable routing, ensuring robust long-term performance. Regular inspection is recommended every six months for reliability. Solar lights, like the CLAONER pack, utilize high-efficiency solar panels to provide robust output and are eco-friendly, making them an excellent choice for campsite lighting solutions.
Recommended Products

Universally compatible: They feature both Bluetooth and ANT+ communication channels, which makes them compatible with the majority of bike computers and smart watches on the market, as well as with the major training apps such as Zwift, Strava, Bkool, TrainerRoad, Rouvy and many others.
NOT Compatible with 720P wireless cameras.

2K HD Video Clarity - Capture every detail in stunning 2K HD resolution for crystal-clear, high-definition video, ensuring superior surveillance both day and night. Ideal for home security, outdoor monitoring, and anyone seeking detailed footage for peace of mind
Minimizing Wildlife Triggers and Reducing False Alarms
Following mounting method selection, installers should prioritize sensor placement, sensitivity adjustment, and site housekeeping to reduce false activations caused by wildlife near RV pads and campsites. 1. Sensor height and aim: Mount motion sensors 7–10 feet above ground, angling downward 20–30 degrees to avoid small animal signatures, use narrow beam lenses to limit lateral detection. 2. Sensitivity settings and range: Configure sensitivity settings to minimum effective range, reduce detection distance to 10–15 feet for pathways, test at night and adjust incrementally. 3. Site housekeeping: Remove food waste and secure trash 50+ feet from the unit, eliminate attractants and clear vegetation within a 6–8 foot radius. 4. Verification: Log activations for one week, refine settings based on recorded false alarms. To further enhance reliability, consider using solar motion lights with higher IP ratings for durability in various weather conditions. This improves reliability and safety.
Etiquette and Neighbor Considerations at Busy Campgrounds
How should campers manage lighting, noise, and site layout in congested campgrounds to preserve mutual comfort, safety, and cooperative operations? 1. Site arrangement: Campers should allocate a minimum 6 m spacing between campsites when possible, orient tents and RVs to minimize direct light spill, and position motion-activated fixtures at 1.5–2 m height with 90° beam angles to reduce glare. 2. Noise and behavior: Maintain noise levels below 45 dB after 22:00, use directional speakers and soft-foot pathways, and enforce quiet hours through polite signage. 3. Lighting etiquette: Select warm-color LEDs (≤3000 K), use shielded fixtures and 10–30 second trigger delays to limit nuisance activations. 4. Wildlife and waste: Store food in sealed containers, remove attractants, and report animal activity to campground management for safety. For effective solar motion lighting, ensure the placement of panels for optimal solar incidence to maintain reliable operation throughout a camping trip.
Maintenance, Troubleshooting, and Long‑Term Care
- Inspection and cleaning: Perform maintenance monthly, wipe sensors and lenses with a lint-free cloth, remove debris within 2–3 mm of the aperture to prevent false triggers and reduced performance.
- Power systems: Replace rechargeable batteries every three months, use 18650 or AA NiMH cells as specified, verify voltage at 3.7–4.2 V per cell, charge to manufacturer-recommended cutoff.
- Mounting and weather care: Inspect adhesive mounts and magnets weekly, reapply industrial 3M adhesive or stainless steel fasteners when bond weakens, store lights indoors below 5 °C during storms to extend lifespan.
- Troubleshooting checklist: Test motion sensitivity, recalibrate for wildlife, check wiring continuity with a multimeter, document adjustments.
- Schedule annual component replacement cycles based on duty cycles, log runtime hours, replace degraded modules.
- Ensure your motion sensor lights have an IP65 waterproof rating to withstand various weather conditions, which enhances their durability and longevity outdoors.
Frequently Asked Questions
What Are Two Drawbacks of Using Motion Sensors?
Two drawbacks are false triggers and power consumption; sensor sensitivity can cause frequent unwanted activations, and installation issues — placement height and accessibility — can complicate adjustments and battery replacement, forcing more maintenance and occasional system failures.
What Is the Problem With Motion Sensor Lights?
Silent nuisance and sudden glare, they suffer frequent malfunction issues from wildlife triggers, poorly tuned sensitivity settings, unreliable wireless connectivity and high energy consumption, making them inconvenient, blinding at times, and costly maintenance‑heavy for users.
Do You Need an Electrician to Install a Motion Sensor Light?
No, an electrician is not always required; battery or adhesive models avoid wiring. He notes motion sensor types, provides installation tips, follows wiring guidelines when hardwired, and observes safety considerations to guarantee proper, code‑compliant installation.
What Is the Best Outdoor Motion Sensor Light?
The best outdoor motion sensor light is a solar powered, high‑efficiency model praised in product reviews; it balances adjustable light sensitivity, straightforward installation tips for mounting, durable weatherproofing, and reliable motion detection for outdoor needs.


